Petrology and mineralogy rely heavily on microscopic observations to understand the composition, texture, and origin of rocks. One of the most important instruments used by geologists is the petrographic microscope. This specialized microscope allows scientists to study minerals and rocks in thin sections using polarized light.
What is a Petrographic Microscope?
A petrographic microscope (also called a polarizing microscope) is a type of optical microscope specifically designed for studying minerals and rocks in thin sections using polarized light.
Unlike a normal biological microscope, this microscope contains polarizing filters, rotating stage, and special optical components that help identify minerals based on their optical properties such as:
- Color
- Pleochroism
- Birefringence
- Extinction
- Interference colors
- Cleavage and crystal form
Geologists use petrographic microscopes to determine:
- Mineral composition of rocks
- Rock textures and structures
- Metamorphic history
- Igneous crystallization sequence
- Sedimentary grain characteristics
This makes it one of the most powerful tools in petrology, mineralogy, and geological research.
Components of a Petrographic Microscope
A petrographic microscope contains several specialized parts that work together to analyze minerals under polarized light.
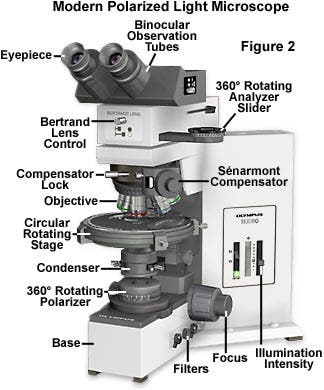
1. Light Source (Illuminator)
The light source provides illumination for observing the thin section.
Modern microscopes use LED or halogen lamps. The light passes upward through the microscope and then through the thin section.
Uniform and stable light is essential for observing optical properties accurately.
2. Polarizer
The polarizer is a filter placed below the stage.
It converts normal light into plane-polarized light, meaning the light vibrates in only one direction.
This is important because minerals react differently to polarized light depending on their crystal structure.
When only the polarizer is used, the microscope operates in Plane Polarized Light (PPL) mode
3. Rotating Stage
The rotating stage is a circular platform where the thin section slide is placed.
It can rotate 360°, allowing the geologist to observe how minerals behave as the stage rotates.
This helps determine:
- Extinction angles
- Pleochroism
- Birefringence
- Crystal orientation
The stage also has clips to hold the thin section firmly.
4. Objective Lenses
Objective lenses magnify the image of the minerals.
Common magnifications include:
- 4×
- 10×
- 20×
- 40×
The combination of objective lens and eyepiece determines the total magnification.
High-quality objectives are essential for clear mineral identification.
5. Analyzer
The analyzer is another polarizing filter located above the objective lens.
It is oriented perpendicular to the polarizer.
When the analyzer is inserted, the microscope operates in Cross Polarized Light (XPL) mode.
This allows observation of:
- Interference colors
- Birefringence
- Twinning
- Extinction
Cross-polarized light is extremely important for mineral identification.
6. Bertrand Lens
The Bertrand lens is used to observe interference figures.
These figures help determine:
- Optical sign of minerals
- Optic axis
- Biaxial or uniaxial nature
This component is mainly used for advanced optical mineralogy studies.
7. Eyepiece (Ocular Lens)
The eyepiece is where the observer looks through the microscope.
Typical magnification is 10×.
Many petrographic microscopes include a crosshair or scale in the eyepiece, which helps measure grain size and extinction angles.
8. Compensators (Accessory Plates)
Compensators such as:
- Quartz wedge
- Gypsum plate
- Mica plate
are inserted into the microscope to study optical properties like birefringence and optic sign.
These are mostly used in detailed mineralogical research.
What is a Thin Section?
A thin section is a very thin slice of rock mounted on a glass slide.
The rock is ground until its thickness is about 30 micrometers (0.03 mm).
At this thickness, most minerals become transparent, allowing light to pass through them.
Thin sections are prepared in specialized laboratories using:
- Rock cutting machines
- Grinding wheels
- Polishing equipment
Once prepared, the thin section is ready for microscopic study.
Procedure to Analyze a Thin Section Under a Petrographic Microscope
Studying a thin section requires a systematic approach. Geologists typically follow several steps to identify minerals and rock textures.
Step 1: Place the Thin Section on the Stage
First, place the thin section slide on the rotating stage.
Secure it using the stage clips so it remains stable while rotating.
Ensure the cover slip faces upward.
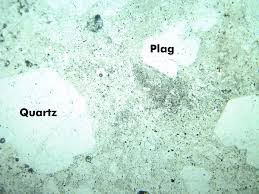
Step 2: Start with Plane Polarized Light (PPL)
Begin observation with only the polarizer inserted.
Under PPL, observe the following properties:
- Mineral color
- Pleochroism (color change during rotation)
- Relief (contrast with surrounding minerals)
- Cleavage
- Crystal shape and boundaries
These features provide the first clues about mineral identity.
Step 3: Rotate the Stage
Rotate the stage slowly while observing the mineral.
Look for:
- Changes in color (pleochroism)
- Alignment of cleavage planes
- Crystal habit
Rotation helps determine mineral orientation and optical behavior.
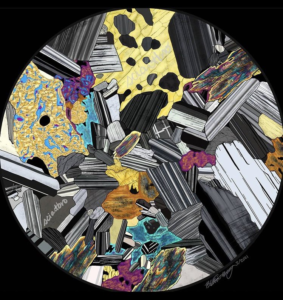
Step 4: Switch to Cross Polarized Light (XPL)
Now insert the analyzer.
Under XPL, observe:
- Interference colors
- Twinning patterns
- Extinction angles
- Birefringence
Minerals display bright colors due to interference of polarized light.
These colors are extremely helpful in identifying minerals such as quartz, feldspar, mica, and calcite.
Step 5: Observe Extinction
While rotating the stage, watch when the mineral becomes completely dark.
This phenomenon is called extinction.
The extinction angle and pattern help identify minerals and determine their crystallographic orientation.
Step 6: Study Mineral Texture
After identifying minerals, observe the texture of the rock.
Important textures include:
- Interlocking grains (igneous rocks)
- Foliation (metamorphic rocks)
- Rounded grains (sedimentary rocks)
Texture helps interpret the formation history of the rock.
Step 7: Identify Minerals
Using all observed properties such as:
- Color
- Relief
- Cleavage
- Interference colors
- Extinction
compare them with optical mineralogy charts.
This allows accurate identification of minerals present in the rock.